
Backcountry skiing is simple. You ski outside the bounds of ski areas, and you hike for your turns. But, of course, it’s more complex than that. You need different gear, you spend most of the day walking uphill, the mountains are uncontrolled for avalanches, and the snow is always thigh deep.
I’m kidding about that last part, but there’s almost always powder to be found in the backcountry, on the wrong side of the canyon, even after your local area has been skied out. It’s a beautiful and different way to be in the mountains, and it certainly makes you appreciate ski lifts.
So, how do you start backcountry skiing? The recipe to starting fun, safe backcountry skiing is as follows: become a strong intermediate skier (blue off-trail, black groomer), have some basic avalanche awareness and gear, learn to be happy walking uphill, and make friends, because we never ski alone in the backcountry. There is complexity and cost to each of these steps, but the route is well-traveled and there will be many friendly faces along the way.
What does backcountry skiing mean?
As I mentioned, backcountry skiing means skiing out of the bounds of ski areas. This means several things. The most important thing to understand is that avalanche mitigation (the early morning magic that lets you ski new powder fearlessly inbounds) does not happen in the backcountry, and backcountry skiers can and do die in avalanches.
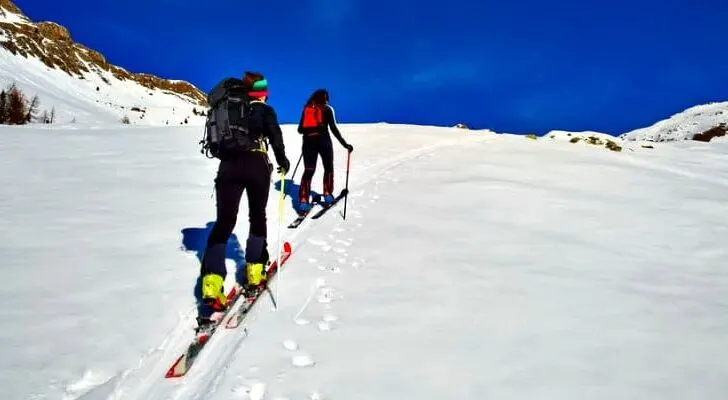
Backcountry skiing also means walking uphill for your turns, or ‘earning your turns’. Usually this is accomplished by skiinning, where your heel is free in the binding and a unidirectional hair ‘skin’ is attached to the bottom of your ski and grips the snow. It’s really neat! The best thing that backcountry means, though, is that there’s no one around to bother you.
Just you, your friends, and the snow. What might get tracked out in the resort in ten minutes can last days in the backcountry. Sometimes you might hear the term ‘sidecountry’. This means ski area adjacent terrain. Also uncontrolled for avalanches, it is usually accessed in some way from ski area infrastructure.
As a ski instructor/guide, I am constantly asked what the ‘path’ to backcountry skiing (or ski touring) is, and how to go about becoming proficient, having fun and staying safe. I’ll briefly talk gear, training and the actual act.
There’s an immense wealth of information out there, especially in regards to gear, but I’ll do my best to build the roadmap. The basic outline, as noted above, is: get the gear to walk uphill, get training to stay safe in avalanche terrain and find friends to go out with.
Backcountry Skiing Gear
If you’re coming from a resort skiing background, much of your gear will be helpful in backcountry pursuits. One of the big wrinkles in this conversation is that ‘compromise gear’ that does everything often doesn’t do it particularly well. While your alpine boots have a slight walk mode, you will suffer going up in them.
The non-negotiable gear is as follows:
Avalanche Safety Equipment
- Avalanche beacon
- probe
- Purpose-built shovel (a Home Depot shovel will not do!)
Hard Goods:
- Skis
- ‘Backcountry bindings’
- Ski boots
- Skins
- A backpack that can carry everything
Especially for new entrants, the easiest way to pick up avalanche gear is to buy it as a set. Most manufacturers will be happy to sell you a beacon/shovel/probe bundle at a discount of some sort. Obviously, these safety tools are useless without the proper training, which I will touch on soon.


Low-angle turns in the Bear Lake Range, Utah
Weight Matters
In terms of the ski gear, weight matters. My backcountry setup is probably ¼ of the weight of my inbounds setup. Even if the gear, especially the boots, don’t ski as well, I find that getting to the top of the line fresh more than makes up for the compromised performance of the gear. There are many things to look for in this gear, and it is important to consider what you will use it for.
Do you want to do 10-15 shorter tours a year? Adapt inbounds gear when possible, and don’t buy weird lightweight boots that you’ll never ski enough to get comfortable in. Planning on skipping a pass next year and hitting 50,000’ vertical feet a week? Invest in the uphill. You’ll spend about 90% of your time walking up anyway.
Boots
In boots, consider the weight of the boots, the effective range of motion of the walk mode, the binding compatibility (tech versus alpine), the stiffness and, most importantly, the comfort. The ultra-classic touring boot that suits many needs is the Scarpa Maestrale. Again, it depends on what you will use them for, but a boot like the Maestrale is the center of the road.
Bindings
In bindings, consider the terrain you will be skiing, your style, your boot compatibility, your hopeful uphill plans, and the ski you will be mounting them on. Most people who tour more than ~10 times a year end up in ‘tech’ bindings. Theses pin-style bindings are incredibly light, walk really well and do a surprisingly great job on the downhill.
Dynafit makes the classic pin-style bindings. More free-ride oriented skiers will gravitate towards frame bindings for increased downhill performance as well as compatibility with boots that do not have tech fittings. If you are skiing a huge, heavy ski such as the Blizzard Bodacious, a tech binding will likely be insufficient to control the ski, while a tiny, backcountry specific ski will not require Marker Dukes.
If you commit to tech bindings, you are commiting to a lighter, more uphill oriented setup, though there are freeride-specific boots with tech inserts, such as the Lange Freetour.
Skis
In skis, again, everything is on a spectrum. The lighter, the better for the up, but the heavier, the better for the down. Most people find that a mid-weight ski in the 95-105mm waist range very adequately handles almost all backcountry conditions.
Sure, neck deep cold smoke would be a hoot on enormous skis, but if you only have one backcountry ski, why make it one you can only enjoy a few times a year? I spent my first few backcountry seasons on a pair of DPS Wailer 112’s, which were perfect, as I’m definitely on the larger side.
Learning to ski the really light backcountry skis takes a lot of time, and there is definitely a sacrifice in performance, but most people I know who stick with touring end up with light skis, bindings and boots.
Skins
In skins, you are thankfully dealing with the most versatile aspect of the setup. Cheap, interchangeable and adjustable, friends can even borrow skins when theirs stop working. From an introductory position, nylon skins are the way to go. Grippy on the snow, they will make your uphill life easy.
I personally ended up on Black Diamond skins a lot, but some people swear by others, such as Pomoca. They are trimmed to fit the profile of your skis, but if your skins don’t go ‘wall to wall’, don’t worry. The vast majority of the grip comes from the material under your feet. Used skins are exceedingly cheap and a great way to start. Just don’t have any material flopping outside the ski!


Spring volcano skiing on Lassen Peak, California
What do I Need to Know?
There are two main ‘skill’ aspects to backcountry skiing: moving in the mountains and not getting killed by the mountains. As I mentioned, being at least an intermediate skier will make the experience far more worth it. I meet people every year who say they will ‘learn to ski in the backcountry’, which never happens.
Downhill ski ability
You get so few runs that it is hard to develop downhill ski ability. I recommend people get at least 50 inbounds days so they are comfortable on skis before they start exploring out of bounds. You don’t have to be a pro by any means, but being able to ski powder (a skill, believe it or not) makes the experience way more worth the sacrifice and suffering.
One common hurdle is that new backcountry skiers will stick to conservative terrain, which is often smart, but they will pick terrain that is often too low angle to make turns on, which confuses the whole endeavor.
Practice your uphill in-bounds
Learning to use the uphill gear is often challenging as well. Most ski areas allow some uphill access on controlled terrain, so there is usually local terrain on which to figure out how it all works and get used to skiing it, without having to go out in variable snow with partners. I definitely spent a lot of time using those generous concessions so I didn’t embarrass myself in front of my new touring partners!
Avalanche awareness
The other critical skill component is avalanche awareness and rescue. Whenever I go out, I make sure that my partner, whether client or friend, could locate me and dig me out, should I be buried in an avalanche. If your partner can’t help you, all the rescue gear is for naught.
This doesn’t mean that everyone needs a $500 AIARE 1 before they can set foot in the backcountry, but everyone needs to have a basic understanding, and ideally there is an experienced group leader who can make those calls. Avalanche awareness talks, often free, give a great framework for further education. Here in Utah, the Utah Avalanche Center has an incredible suite of online resources, available for free!
Take advantage of the resources. Avalanches are scary and dangerous and need to be taken seriously. For users who anticipate spending more than a few days a year in the backcountry, a Level 1 course is well worth the cost, and it will eventually save your life or someone else’s.
All that said, as long as you’re familiar with the gear and can move uphill, a Level 1 is not beyond any user. Even if you’ve never done a real backcountry day, you will be comfortable in a Level 1 and learn a lot. I cannot recommend that education enough. Take courses early and often.
These courses help backcountry users read the local avalanche forecasts that advise users on avalanche hazard for the given day. These forecasts are critical to safe travel in the backcountry. The forecasters who put them out are consummate professionals!
Partners and Actually Getting Out
So you’ve got a setup and hopefully some avalanche education. It’s time to start heading out into the hills! Who do you go with? Where do you find partners? Do you go alone? How do you know if you’re being safe? Those are some big questions.
Apart from uphill practice in the ski areas (again, check with your ski area, policies vary), I always ski with a partner. Even if it’s not an avalanche zone, there are many variables in the backcountry, and I certainly don’t bank on a ski patroller showing up to help.
Where to find these partners? Your Level 1 course is a great place to start. You will be stuck for a weekend with a dozen other eager new tourers also looking for friends! Having partners to grow with is both critical and rewarding.
The other people in your Level 1 are in the exact same spot as you and often have cool perspectives to bring to ski touring. Chat them up! I can’t tell you the number of times I’ve ended up bumping into people from my Level 1, years later. It’s a small community.
People also often come into ski touring through an experienced friend, partner or mentor, and these people often make great partners. They bring experience to the table and can keep you safe in ways novice friends cannot. Some of my favorite partners have decades more experience than me, which means a ton of knowledge and expertise to draw on, but also some potentially bad habits.
Be careful not to unquestioningly accept your mentor’s ski paradigm, if you’re lucky enough to have one. They’re likely giving you good advice, but with the vast trove of resources out there, it’s always best practice to cast your net wide.
Hiring a backcountry ski guide
Sometimes, if you’re like me, you just get the idea in your head to go touring. None of your friends do it, and none of them want to do it, and maybe you just didn’t connect with the people in your Level 1, or you haven’t taken it yet. You want to go out, but maybe you want to make sure you’re safer than you think your friend Johnny will keep you.
Thankfully, there are partners for hire, who will keep you safe, help you find the best snow and might even be fun to hang around with. Backcountry ski guides (mountain guides) are available for surprisingly modest rates and offer a huge range of products.
From pure ‘backcountry ski days’ to clinics on snow stability to ski touring tactics, guides are an excellent resource, especially for people who may not have the partners or the time to burn 20 days figuring out how it all works. With a legal mandate to keep you safe, they’ll probably keep you ‘on top’ a lot longer than your friend Johnny.
Plus, when you go out with a guide, they aren’t dragging you along, they’re building backcountry days around your skills and goals. Rates, especially for groups are relatively modest (as low as $100/day/person depending on the operation). We’re not a bad sort, I promise. If you come to Utah, I’m available.
Up Next In Winter Adventure:
7 Common Winter Recreation Mistakes
Cheap Ski Resorts in Colorado: Our Top 10 Picks
How Do You Get in Shape for Snowshoeing?
Where Can I Backpack In The Winter? (9 Favorite U.S. Trails)
Mountain/ski guide and instructor
Leave a comment
You must be logged in to post a comment.