

Nothing ruins a snowboarding trip faster than getting caught without the right gear. We’ve made a handy checklist with all the snowboard gear you need for a day on the slopes or a day in the backcountry. Make sure next time you hit the slopes you’re ready for whatever the mountain throws at you.
NOTE: This checklist is for snowboarders, but if you ski you can swap out the boots and board, for skis boots and poles. The kit is almost identical. The sports aren’t so different after all.
The Basics
These are your absolute essentials. If you’re riding from chalet to chalet, heading into the backcountry, or anything in-between, you’ll need a board and the clothing to match.
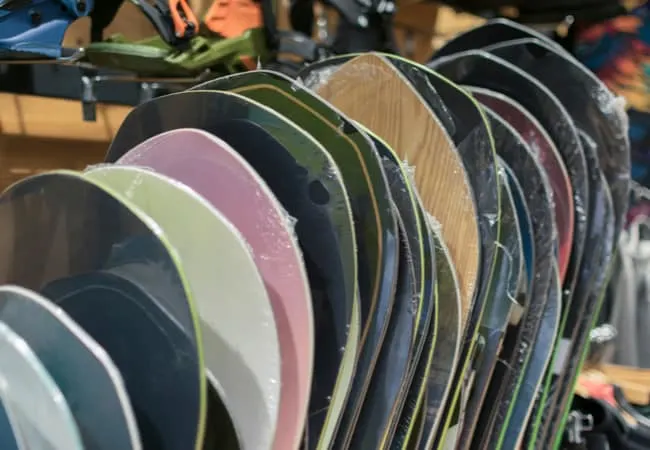
Snowboard
These might all look the same, but the paint job is not the only difference between snowboards. If you’re big into the sport, you might have a quiver of boards for varying conditions and styles of riding. Stiffness and shape of the edges are key factors that can drastically change the way a board rides.
Here’s a quick crash course in boards, without loading you down with jargon. In the future sometime we might make a full article about what kind of board will suit your riding!
A beginner board will be softer and have less aggressive edges. These can be more forgiving if you make mistakes and won’t take as much energy to flex and maneuver as an advanced board.
Boards made for riding in terrain parks tend to be more flexible. They also have more of a dish-shaped base (called a rocker). This means it won’t grab an edge as easily but is great for presses and spins.
A race board or something made to go fast might be stiffer so it can hold an edge at speed. They also can be longer which gives a more stable ride when you get going faster.
Backcountry boards are built wider to float on deep snow better. Newer boards are even being made with a “swallow tail” or a cutout in the back of the board so you don’t need to lean back as hard to keep your front end (nose) out of the snow. Splitboards are also a new trend for backcountry, and we’ll talk about those further on.

Bindings
Those things that connect your boots to the board? They can actually vary quite a bit. The stiffness of the binding front to back plays a large part in how your edges connect with the snow. The amount of torsional (twisting) flex in the bindings has an impact on the way your board will flex and react to your movements.
Of course, the weight of the binding impacts your riding too. It can affect the ease of how you move the board, and of course how high you can jump! The more you spend on bindings, the lighter you can get them, so the weight of your binding will come down to your budget.
Boots
There are many things that go into building snowboard boots, but the biggest difference is how stiff they can be. Some are quite soft, which makes for a comfortable and smooth ride. Comfort comes with a tradeoff though, a soft boot will lack control on hard snow or at speed.
The opposite is true for stiff boots. While they can offer you more control over your board, they make for a less comfortable ride. You’ll always need to stay focused on your movements. A stiff boot can be less forgiving- shift your weight ever so slightly in the wrong direction and you’ll have caught an edge and be tumbling down the hill!
Helmets
Gone are the days where only the “uncool” wore helmets. The majority of people on the slopes wear helmets now. Even if you trust your own ability, most injuries happen because of other riders!
Nowhere is safe. If you’re on a beginner slope you’re more at risk of being cleaned up by an out of control newbie. If you’re on an advanced slope, while collisions are less common, they tend to be even more devastating.
Most helmets tend are built for a single (large) impact. It’s unfortunate, but after a big collision, your new helmet won’t protect you as well as it used to. This is why I recommend against rental helmets. Not only do you avoid all the nasty sweat from strangers, but you have the peace of mind of knowing no one else has compromised the integrity of your helmet.
Snowboarding (and skiing) are extreme sports. It’s important to invest in a quality helmet.
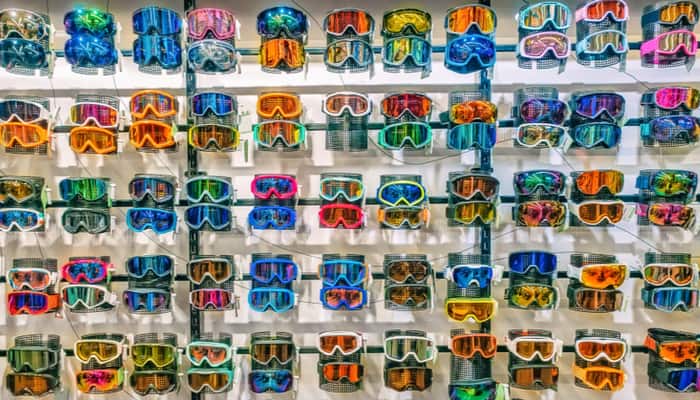
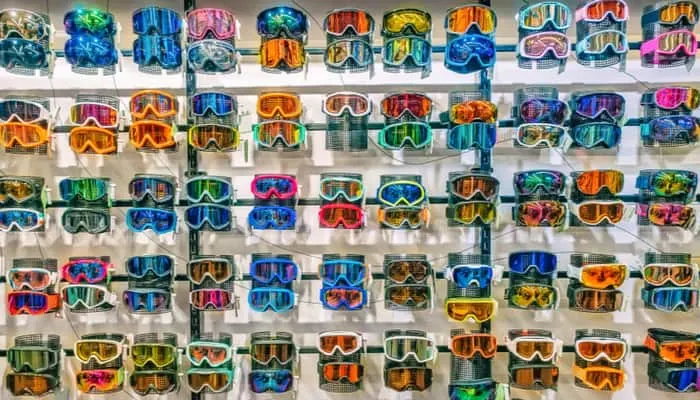
Goggles
Goggles don’t only protect you from UV rays reflecting off the snow, but also make a huge difference in the clarity and contrast you’ll see on the hill. The better suited your goggle is to the conditions, the better you’ll be able to make out the definition of the snow. If you can see what’s in front of you, you can make adjustments to your riding and be a better rider.
You don’t want to wear sunglasses on the hill unless they are specifically made for winter sports. Of the rack glasses are likely not shatter resistant, are almost certainly not optimized for clarity on the snow. Unless they are a close fit, they won’t protect your eyes from wind and wayward UV rays as well as goggles too.
Goggles are generally classed in 4 categories, depending on the percentage of VLT (light) they let in.
Category 1 lets in the most light and is best for overcast and snowy days. Category 4 lets in the least light and is really only suited to a bluebird day in the high alpine.
For someone looking for an all-round goggle, I’d recommend a Category 2. You won’t get the best performance in sunny weather, or snowy weather, but you’ll get adequate performance no matter what the conditions.
If you’re looking for the best coverage from a single lens I’d recommend something like Oakley’s PRIZM technology. It’s expensive but gives you lots of contrast across a broad range of light. Their Category 2 lens might cost more than an entry level lens, but it gives more definition, making the lens a more practical buy.
The Clothing
If you’re spending a day on the mountain you’re going to want to be warm, and dry. Snowboarding is hard work, and good snowboard kit breathes. This means you don’t overheat and sweat too much while you’re working your way down the hill, but you don’t freeze on your way back up! A good rule of thumb is to start your day cool (not cold) and wear a midlayer you can take off as the day heats up!
Jacket
A good snowboard jacket will be waterproof, and breathable. You can usually tell if a jacket is purpose-built for the snow as it will have a small “lift pass pocket” built into one of the sleeves. This is for your electronic lift pass, so you can get through the gate on the mountain. It also should have a powder skirt.
This is an elasticated piece of fabric inside the jacket around the waist of the jacket that will keep snow out after a big fall.
Most snowboard jackets are fully insulated, but outdoors brands like Arc’Teryx, Patagonia, and Salomon also make shell jackets for ski and snowboard touring. These will work perfectly on the piste as well as off. You’ll need to work to build your layering system, but a shell jacket is an excellent choice for more comfortable temperature regulation.
Pants
Waterproof, waterproof, waterproof. Jeans or trek pants aren’t enough, even for a seasoned pro. You want your snowboard pants to be completely waterproof so your legs stay dry and happy.
Snowboard pants are built with a moderate amount of insulation, and if you need more you can adjust your baselayers accordingly. You can also look for pants with built-in vents to keep you cool when the sun comes out.
More info: What Pants Should I Wear for Winter Hiking?
Baselayers
These are your next to skin tops and bottoms. Baselayers will help wick moisture from your skin and keep you dry and warm. I usually take a few different weights of Merino wool baselayers on a snowboarding trip. These are odor resistant so I can wear them for a day or two before they need a wash. Plus they are quick to release moisture on the slopes. When I do wash them they’re dry by the next morning!
Midlayers
You don’t usually wear a midlayer on your legs, only on your upper body. This can be anything from a second thin baselayer, to a full on down jacket (advisable in a shell only).
Depending on the weather you’ll want something extra to wear in the morning or if the afternoon has cooled off. How warm your jacket is will play a large factor in this. I personally wear a thin midlayer that I can take off at lunch and stash in my jacket pocket.
Gloves/Mittens
You don’t want to spend your day indoors warming your fingers up. Which you decide to gets comes down to personal preference. People like the flexibility of a glove, but mittens are more efficient at keeping your hands warm.
Dexterity is a non-issue when deciding between gloves and mittens. Anything you can’t do with your thumb and forefinger you’ll need to take your gloves or mittens off to do. I challenge all the readers to think of one thing you can do with a glove that I can’t do with a mitten. Post your responses in the comments section, I’ll wait.
I’ve always worn mittens with a liner glove. My liner means that I can keep the mitt hygienic, removing my sweat at the end of the day. Once you put gloves or mittens through the washing machine once the waterproofing is usually done for. As well as being cleaner, a liner protects your hand from the cold. When you take your out of your glove (or mitt) for dexterity it’s not being directly exposed to the cold.
Socks
While you might think you need thick socks for warmth, on most days thin merino or technical socks will work perfectly fine. Your boots are already designed to be quite warm.
Thicker socks will hold on to more moisture and might make your boot not fit as well. I’ll usually buy ski socks to wear in my snowboard boot. They’re made from techy fabrics that work well at keeping my foot dry and warm without compromising my boots fit.
Neckgaiter
This is an extra layer of warmth and protection where your jacket collar ends and your helmet hasn’t started. A fleece neck gaiter is great on colder days, but a thin merino wool gaiter (Buff makes a great one) is perfect for pulling up over your nose when it gets cold.
View this post on Instagram
The Extras
Now you have your basics covered, but there are some extra things you can bring along to make your day that little bit more comfortable. Depending on your level of riding ability and what kind of trip you’re taking you might want to bring some, or all, of these.
Backpacks
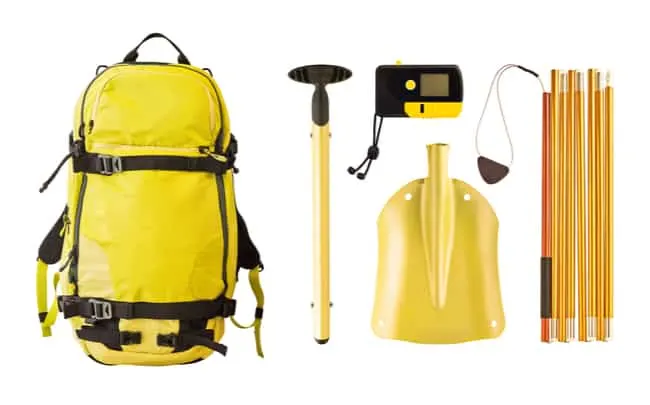
While not essential, a backpack is much more effective than packing your essentials into your jacket pockets. If you’re going to be on piste for the day a slim backpack will work best. This way you don’t need to take it off on the chairlifts. If you’re venturing into the backcountry a bigger bag with a board saddle and pockets for shovels and probes is essential.
Hats
You shouldn’t wear a beanie underneath your helmet as this will compromise the fit of the helmet, making it less safe to wear. Helmets have built-in insulation anyways, so you’ll be fine without. I usually bring a beanie with me to wear when the helmet comes off in the chalets, or while I’m hiking and touring.
Sunglasses
As mentioned above, sunglasses aren’t safe or suited for riding. They aren’t a substitute for snow goggles, but if you’re having a drink in the sun it’s nice to take your goggles off and let your face breathe!
Suncream
Because the UV rays are beaming down hard (at higher altitudes you burn much faster) and reflecting off the snow it’s important to cover up! You can get a nasty burn after just a few hours exposure on a sunny day, and you’ll still fry if the weather is overcast. Your lips are bound to dry out too, so lip balm with a SPF protection is a handy addition too.
Protection
Even for veteran snowboarders falling is a part of the sport. While not for everyone, beginners or people who are nervous about injuries can bring extra protection. Wrist guards and back protectors are useful accessories if you’re worried about falling!
Board Tools
A multi-tool to tighten bolts and make adjustments to your bindings on the fly can be handy to bring with you. Most resorts have tool stations near the lifts, but these are helpful if you’re venturing further away or want to make adjustments as you go.
Camera/GoPro
Capture all your tricks and falls with an action cam. Bring along a GoPro or other action camera to mount on your helmet and film yourself and your friends. If you’re bringing your expensive camera make sure you have a well-padded camera bag.

Snacks
Lunch on the mountain can be expensive! I like to pack a few energy bars and a few snickers bars to keep myself fueled and save some cash. If you’re spending the whole day out, pack a sandwich or wrap as well. The trick is to bring something loaded with calories (snowboarding is hard work) and something that won’t get wrecked if you fall on it.
Water
Water is always great to have on hand. Bring a small water bottle you can refill in the chalets if you’re going to be riding in a resort. If you’re spending a day away from the resorts bring a few liters along.
Hydration bladders are great too, but remember the weather! You’ll need to get insulated tubes for your water bladder so it doesn’t freeze up. Most major manufacturers of hydration packs sell insulation accessories or sell insulated tubes you can attach in place of your normal ones.
Bonus Kit- Backcountry
Planning on getting off piste? Getting into the backcountry (or lift accessed backcountry- slackcountry) can be a great way to spend a day out. You’ll hike up isolated peaks and earn some turns down (hopefully) untouched faces.
The backcountry can be dangerous and you need to bring a few more things than your board and boots. To stay safe and make sure you get to where you want to go you’ll need to bring a bigger backpack with an avalanche kit at least.
Avalanche Kit- Shovel, Probe, Beacon
These are essential in the backcountry, don’t leave home without them. Before you go out you should take at least 1 training course to make sure you know how to use them. Keep learning too, take a refresher course at least once every season.
Without a beacon not only will you be putting yourself in danger, but you’ll be putting everyone else in danger as well. People are relying on anyone who sees an avalanche to react and be able to start the hunt for them.
Don’t forget the shovel and probe either. A beacon is no good without a probe and a shovel to use locating someone and digging them out!
Even if you think the conditions are good, avalanches can happen. Don’t take unnecessary risks and pay attention to the conditions. Going into the backcountry without the proper training puts everyone at risk.
Transportation
Everyone can get to the lift accessed backcountry (side country or slackcountry) by hiking in your snowboots (bootpacking). To get to the best stuff you should consider investing in a pair of snowshoes or a splitboard.
Snowshoes
Snowshoes are the cheaper but less efficient way of getting into the backcountry. You’ll be able to trek over deep snow without sinking down to your waist, making it much easier to access those untouched faces.
Splitboards
A splitboard is a snowboard that has been cut in half, down the middle. When detached, the two separate halves of the board become a pair of cross country skis. They take a specific type of binding that can be twisted to face forward and detach at the heel when in tour mode.
When you invest in a splitboard you’ll also need to get skins for the board. Skins are strips of fabric that attach to the bottom of your “skis”. They are covered in micro-hairs that point downhill, giving you traction when climbing- so you don’t slide back down!
You’ll also need to get some poles. It seems silly as a snowboarder, but they provide the necessary balance and extra push to move efficiently when you’re in tour mode.


Watch “Splitboarding 101” on youtube for a beginner look at the sport.
Backpack
A touring backpack will be a bit different from an on-piste backpack. You’ll need extra space in the bag for your emergency kit, and a saddle, or straps to attach your bag to the board is really beneficial. You’ll also be much more comfortable with a waist belt to help take the weight of your bag off your shoulders.
Also read: 10 Essentials for Day Hiking
On top of the essential kit, when heading into the backcountry consider bringing the following to make your day more enjoyable (and safer):
- 2 liters of water, at least
- Lunch, and plenty of snacks
- A first aid kit
- Emergency shelter or bivy
- A packable down jacket for when you stop for lunch
- Walkie talkies or portable radios to keep in touch if your group is separated
- A snow study kit to check the conditions as you go
- A pocket stove or flask for coffee on the go

Extras
For more protection, you can also bring along an avalung or an airbag. Avilungs come built into touring backpacks, they’re a tube that pulls air from a filter in the bag. This allows you to keep your airway clear in the event of a tumble and prevents you suffocating in an avalanche.
Airbags are also usually built into backpacks. In the event of an emergency, you can activate your airbag. It inflates using disposable Co2 cartridges and may increase your odds of staying above the snow.
Get Outside!
We hope this list helps you pack for your next trip if you’re only learning, or heading to the backcountry hunting for powder. Snowboarding is all about having fun, and there’s nothing fun about not having the right kit.
Read next:
Cheap Ski Resorts in Colorado: Our Top 10 Picks
How Much Do You Get Paid As a Ski Instructor?
Dreaming Of Moving To A Colorado Ski Town? Here’s What I Discovered
Kyle is a Canadian outdoorsman and adventurer. He’s been climbing, hiking, biking, surfing, snowboarding, and working around the world since 2013. He’s recently relocated to Innsbruck, Austria.
Leave a comment
You must be logged in to post a comment.