
A long and strenuous hike with many switchbacks can be one of the most rewarding experiences. Yes, it will be tough, but the views found at the top are typically worth every ounce of effort. Never heard of a “switchback” trail before? Let’s dig into the specifics of this unique type of trail.
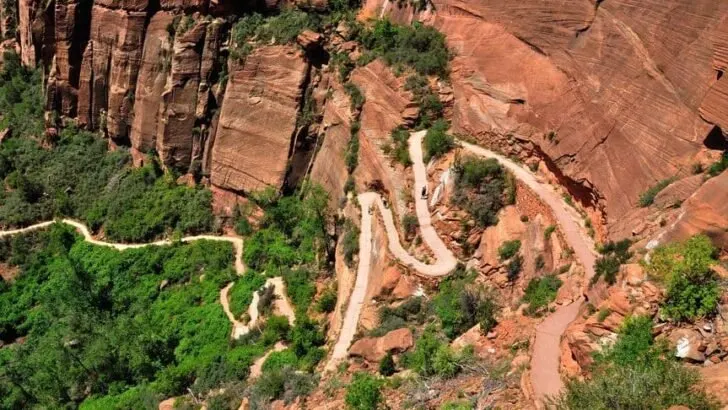
So, what exactly is a ”Switchback” in hiking? A switchback in hiking terms is defined as a trail that cuts sharply from one direction to the other while going up a steep hill or mountainside. Instead of climbing straight up from the foot of a hill to the summit, this specific type of trail allows your hiking effort to be eased through several lesser degree slopes.
Why are switchback trails built?
Like what I have mentioned earlier, instead of directing your climb up to a steep mountain, switchback trail makes your hiking experience manageable. They are built to prevent hikers from falling off due to its loose soil. Because of elevation grade reduction, it lessens the difficulty of the climb. Hence, making it easier for hikers to climb a less-steep route yet a longer one.
Moreover, they are also built to protect the hill and trail from excessive erosion. It helps keep the trail at a consistent gradient which also allows trail planners to set up erosion control by building rolling grade dips. This prevents water from up the hill to run down straight which could lead to damages in vegetation and some major trails.
Switchback VS. Direct Hike
The challenge that hikers encounter during climbing a switchback is having to endure longer hours of hike due to longer trail. What hikers need is a strong endurance to finish the whole hike. This could be a lot easier than a 90 degrees ascent but could also be a lot tiring compared to a direct hike.
On the other hand, a direct hike is much shorter to climb yet more difficult and dangerous than switchbacks. Some hikers prefer this method while some prefer a long yet steady pace.
Tips on preparing for a switchback
To prepare yourself for a long and difficult hike such as trekking on switchback (especially if you are a first timer), you need to prepare yourself physically. Getting in shape before a hike will reap you good benefits such as training your lower body for long and sheer slopes. The more you get used to it, the more you can endure difficult level climbs.
One thing I have done before that has helped me a lot is using the stairs every day to train my knees and legs. Once you are used to doing one step at a time you can do it two steps at a time.
Moreover, doing a cardio exercise can help you increase your stamina and endurance for long hikes such as switchbacks. You could go for squats since they target leg muscles which we predominantly use in hiking. Also, try working out using downhill lunges. This will help you in steep descents.
Stairmaster could also be a good exercise since this strengthens cardiovascular endurance and climbing muscles. And lastly, do not forget stretching to ensure that you avoid any injury. You could do this a month before your scheduled hike so that your body can be well-prepared for it.
Also, preparing the right gear such as hiking shoes, trekking pole, mountaineering bag with a built-in water container and comfortable hiking clothes will be beneficial. Especially with shoes, invest in a durable pair. Having these will save you from a lot of unforeseen accidents. And so it is important to plan.
Below are some of the basic things you will need in hiking a switchback:
Things to pack for hiking a trail with several switchbacks (Beginner’s guide)
30-40L Hiking backpack
- Navigation tools such as a map and compass
- First-aid kit
- Knife or multitool
- Hydration bladder (2-3 liters of water bag)
Weather-appropriate clothing
- Spring – lightweight shirt made of synthetic fabric, insulated water-resistant jacket or long sleeve, long pants
- Summer – convertible hiking pants, or shorts, shirt made of synthetic fabric
- Fall – same with spring clothes
- Winter – base layer cloth on the lower and upper body, an insulating layer which is thicker than the base layer, windproof jacket
- Hiking boots or hiking hybrid shoes
- Hiking socks (layered in colder weather)
Food plan
- Breakfast – Dehydrated eggs, Granola, dry cereal, dried fruits
- Lunch – bagels, energy bars, nuts, jerky, dried fruit
- Dinner – instant rice, ramen noodles, instant soup, packaged meals
- Snacks – trail mix, nuts and seeds, pop-tarts
Shelter
- Sleeping bag and pad (for an overnight stay if there are no accommodation)
- Tent (for an overnight stay if there are no accommodation)
Optional assistance
- Trekking pole


How to overcome a strenuous hike with switchbacks
Now that you have prepared yourself, the next thing you should know is how to overcome a switchback during the hike. Below are some helpful tips for you.
- How to hydrate yourself and packing a lot of snacks.
The amount of water you will need to bring depends on how long the hike will take and its environment. Especially with switchbacks, this might take you extra hours on the trail. Like for instance, hiking towards Havasupai falls which has switchback trails at the beginning; you will be trekking over 8-10 miles in the heat without a water station.
And so having at least a 2-liter hydration bladder will suffice. Drink small amounts frequently. Set a timer every 15 to 20 minutes to remind yourself to take a few sips. Also, always make sure to bring more food than what you eat. Bring snacks which can help your hydration such as a ziplock of sliced apples, cucumber and grapes.
Also, dried fruits, nuts, protein bars are few snacks you can munch on to retain your energy during the hike.
- Research the terrain
Now there are no shortcuts in hiking a switchback. So what will be helpful for you is to mentally prepare yourself by doing the right research on your destination. Check how many switchbacks you will be facing. How long will it take and how far is it going to be. Researching about it will help you pack the right gear and set your mind to finish the course no matter how many switchbacks there are.
- Don’t cool down your body fully during breaks
If you want to overcome these switchbacks, you are going have to keep yourself moving even during breaks. Avoid cooling down because this could abruptly decrease your heart rate. Your heart is pumping hard and if you just stop altogether, you can really get ill. This is to prevent blood from getting pooled in the lower extremities, which may cause dizziness or possible fainting.
And so it is much better if you just walk around a little bit or remain standing until you feel your body settle down. Especially for a long trail such as switchback, this could help you finish the track just in time.
- Maximize the use of hiking poles
Although some hikers do not prefer using these, the use of hiking poles during a long climb helps your stability. This could lessen any strain on the knees, keep yourself balanced and establish your rhythm.
These poles reduce the impact of hiking on our knee and leg muscles. The upper body supports the lower part by allowing the weight to rest on these poles. In hiking for longer hours, you can shorten the pole on the uphill portion and lengthen the pole on the downhill side as needed to manage your comfort and stability.
- Lastly, keep a positive attitude
A switchback trail can also be more challenging if the trail contains a chain of several switchbacks. No one says the journey towards the peak is going to be easy. It will require your patience and endurance for long hours of trekking. It will take your sweat and blood in encountering the difficult and death-defying edges.
And it will even challenge you to go further at times you feel like giving up. But overall, always remember to keep a positive attitude. An anonymous hiker once said, ”the best view comes after the hardest climb.” Though you will face hardship in hiking a mountain, a joyful disposition will keep you moving until you can finally reach the mountaintop and say, it’s all worth it.
Famous switchback trails
- St. Gotthard Pass
Also known as Passo San Gottardo or Passo del San Gottardo, is an alpine located in France. It is 6,860 ft or 2,091 meters above sea level. This is the ultimate switched back cobbled climb in the world.
- Col de Chaussy
This climb located in France is a difficult one. It is over 3,280 ft or 1,000 meters tall, starting from a narrow path to high fields. The foot of the mountain is known as Les Lacets de Montvernier French for ”the Shoelace of Montvernier. This is interesting to climb because of its unique form of a mountain road.
- Oberfelben
This is located in Austria with 7,359 ft or 2,243 meters high. This possesses 20 switchbacks with dead ends. It also has a lake known as Hintersee which is followed by a long hiking trail. This is said to be the most famous climb in the world.
- Passo San boldo
This is one of the famous climbs in Italy with 2,316 ft or 706 meters. This is a small mountain with extreme topography and possesses five tunnels.
- Lysefjorden road
This climb is located in Norway endowed with scenic beauty. It has 3,057 ft or 932 meters high. Climbing this requires extra caution because of its twist and turns. But overall, hiking this one should be on your bucket list.
Summary
Now that we both have a glimpse of what a switchback is, how to prepare and overcome one, we can now apply these tips for encountering one in the future. There are no shortcuts in hiking a switchback.
It will always take you to a longer route yet safer and more manageable. While other hikers rant about this part of the trail, let us try to enjoy it. After all, these switchbacks are built for a reason and one of those is to enjoy nature at its finest. And lastly, always remember to have fun in hiking even if it means taking that long zigzag route—the switchbacks.
Related content:
18 Of The Seattle Area’s Most Breathtaking Day Hikes You Must Do
The 10 Hardest Treks in the World
What is the Longest Hiking Trail in the World?
Erick is a freelance writer and outdoor enthusiast. Growing up in Nairobi Kenya and now calling Glasgow, United Kingdom home. Sipping on homemade spiced swahili tea and enjoying a good book is his idea of bliss.
Leave a comment
You must be logged in to post a comment.